Dried flower stickers in 3 simple steps – pick, dry, craft.
*Scroll down to follow more detailed steps for yourself.
I don’t feel like I can timeline a craft era in my life other than to say it’s been an on/off obsession for most of my life.
I like to dip and dive from one art or craft to another, often having several WIPs (works in progress) at any given time. Some of these WIPs I do finish, some I leave in my craft box with the intention of coming back to, and others get discarded and materials will get donated to the local charity shop. I would like to describe my manner towards crafting as ‘jack of all trades, master of none’. I like to dabble and move on. This is a great example of the kind of craft which satisfies my itch. I like to see progress in crafts I try or, in this case, take it slowly. I am truly passionate at trying new things and learning. Dried flower stickers really lend themselves to my impatient nature I sometimes have towards crafting. It is in my nature to want to do everything, have several ideas that I want to excecute at one time but then none of them ever materialise because I hit a block; too many ideas often means I start none of them. However, this particular craft encorporates other passions in my life; being out in nature and spending time with my boyfriend.
Walking around our local area is an activity we do frequently together. A walk offers our relationship quality time, whilst also staying fit and healthy. Win, win! We recently moved in to a new area and we have been taking different routes to mix our evenings up. Whilst we had been taking a stroll through the streets, we have seen so many wildflowers which has absolutely inspired the desire to start drying flowers and using them for crafting opportunities.
Let’s get started!
Step 1. Get your walking boots on and head out to your local area to start searching for some pretty flowers you’d like to experiment with.
What I find stops me from starting a craft is the initial investment or reading too deeply about the craft, swimming in Pinterest ideas or gaining too much information which is ultimately where I switch off . I’m a hands-on visual learner. I also like to navigate my way through new hobbies independently. I don’t like to rely heavily on step by step instructions, too much guidance or advice. I welcome mistakes and I’m open to crossroads. When we make mistakes, in psychology and education, it is referred to as concept error-making. When we are free to make mistakes, this is an opportunity to develop meaningful learning.
I have a deep love for peonies and they are very much in season right now. Before I stepped foot outside the house, I cut the heads from some store-bought peonies once they had bloomed because why wouldn’t you want to extend their prettiness. Another flower which I love to pick is a daisy. It reminds me of being younger, sat on the green with friends, making daisy chains to our hearts content.
What will I need?
- A willingness to get outdoors
- An idea of where your local wildflower hotspots are.
- We took an old packed lunch box to store our flowers in.
- A pair of scissors to cut the heads off.
What are you waiting for? Get out there!
Step 2. The drying out part.
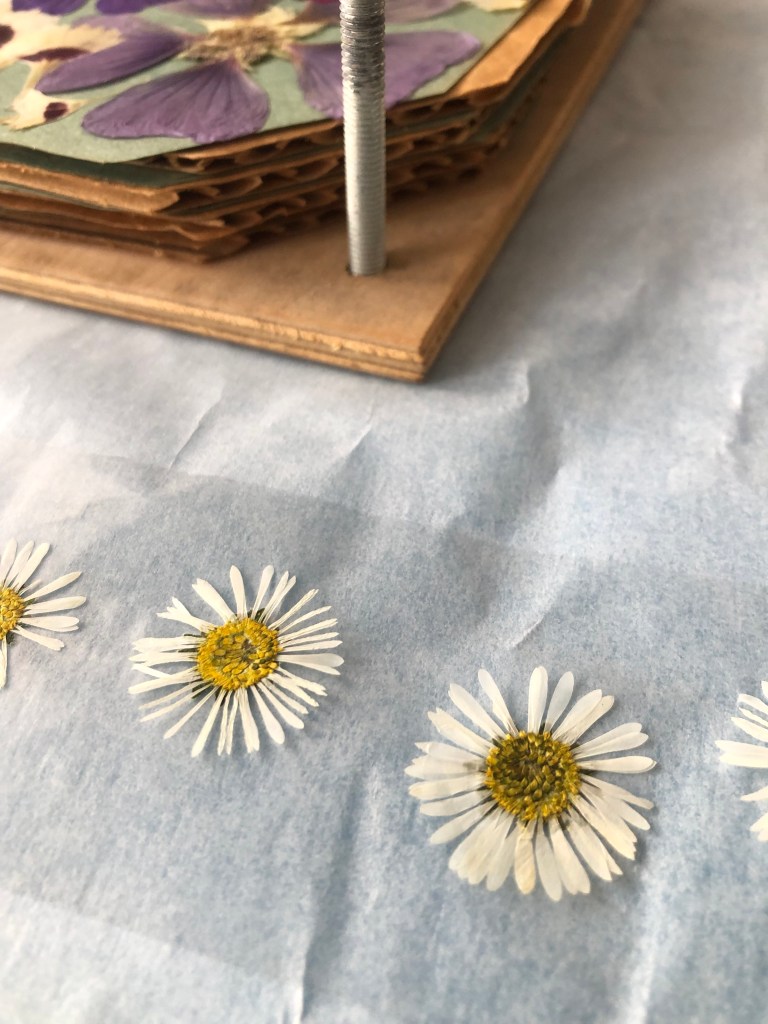
See my image below for an example of the flower press I have used in this craft. I thrifted this at my local charity shop for around £2. You can find these at your local hobby store, create one yourself or hope to come across one thrifting like me. It was an exciting find, as when I opened it up, someone else’s project still remained inside; autumnal dried leaves. I did however, not keep these. When I first saw the leaves, I thought about all of the projects I could do using these leaves, turned to Pinterest for more ideas and suddenly I was no longer engaged in the craft I had chosen. Another example of dipping in and out of crafts; I get sidetracked. I allowed myself the tangent for a short time and then actioned what I needed to do to come back to my own project.
What will I need?
- A flower press/heavy stack of books.
- Blotting paper/newspaper/sugar paper.
- Cardboard.
- A dark dry corner of your home.
Ensure the flower heads are trimmed enough so they can lay flat to be pressed. I used sugar paper to enclose the flowers within each layer. I then topped off the layer with a piece of corrugated cardboard to seperate each layer when drying. I layered the flowers in this order until I could screw the ‘lid’ of my flower press on the top layer and tightened the bolts as far as I could to ensure no moisture would get inbetween the layers whilst the drying process took place. Here you can use the paper layers with the cardboard to construct the same process but alternatively heavy books can be placed on top of the layer to create the same effect to dry.
Next is the easiest part of the steps, not the most fun but definitely easy; wait! I waited around 3 weeks before I checked my flowers progress and it seemed that this was a near on perfect time to leave them. Depending on how much moisture your flowers are storing at the point of picking, depends on how long you will need to wait for your flowers to dry.
and here they are…

For my first time, I wanted to dry a variety of flowers, so I had lots to work with but also to see how they all react. Lots of my first flowers were unusable; they were stuck together as I hadn’t seperated them at step 1, some had not fully dried out, some lost their petals when handled (tweezers are recommended for the handling of your delicate petals). However, many of them were absolutely perfect. My favourite flower that I dried were daisies. They are super adorable and are perfect for the project finale.
Step 3. Get creative!
Here is your project finale. This step is your final step and your stickers are ready to use as soon as you have constructed them.
What will I need?
- Baking parchment paper
- Wide selotape
- A pair of scissors
- Tweezers to handle your petals
I layered baking parchment paper at the bottom, a strip of selotape on top of the paper (sticky side down, shiny side up). Next you want to add your pretty petals to the shiny side of the tape. Organise them in a way you’d like your stickers to look like. I placed mine on to the tape with gaps in between each flower as I knew I wanted to have each flower head as a seperate sticker. The trickiest part I found was now layering another piece of selotape directly over the first piece and managing the air bubbles which may get trapped between the layers. Be careful also for static as this may move your placed flowers and affect the end result. I like to work with smaller bits of tape and not long one strip which meant I could accurate control the layering. Once the layers are placed, you can cut out your stickers and use them wherever you’d like. I stuck mine on to my water bottle and my boyfriends water bottle. A real treat!
NB. the baking parchment paper layer is the back of the sticker which can be peeled off and then discarded, leaving you with a cute dried flower sticker.